In this article, we are going to explain how to use the ithlete Pro Training Guide. Most Pro users really love this feature when they get used to it, but we have been told others don’t fully understand what the chart is showing them. We have written this starter guide to help you learn what it can tell you more quickly.
In a nutshell, the Training Guide tells you:
- Your HRV and resting Heart Rate relative to your own baseline
- Whether your recovery is in your normal range, or below normal
- How your body is adapting to the training you are doing
- Whether your body is feeling stressed, excited, calm, or relaxed
- How recovered and fresh you are
- The distribution and trends of all these factors over the past 28 days
The best thing is that all this is shown on a simple colour coded 2-dimensional chart without any numbers to remember.
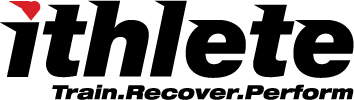
The framework of the chart is a 4-quadrant (4-boxer) chart where the horizontal axis is Recovery (HRV), and the vertical axis is Activation (HR). Points to note are:
- The centre of the chart represents your baseline for both HRV and HR
- Points to the right of the centre mean higher HRV than normal
- Points to the left of centre mean lower HRV than normal
- Points above centre mean higher HR than normal
- Points below centre mean lower HR than normal
- Corners represent extremes, and don’t occur very often
- Today’s dot has a dark circle, yesterday’s a lighter circle and the remainder of the last week are also shown coloured, whereas the previous 3 weeks are shown in grey.
The Normal Training zone is around the centre. You can do any workout from your training plan when in this zone.
The Intensive Training zone is to the right of the centre. This means your HRV is higher than normal whilst your resting HR is still in your normal zone. Readings in this zone are also shown green and mean you are fresh and ready for those demanding HIIT interval, or tempo/over-under workouts.
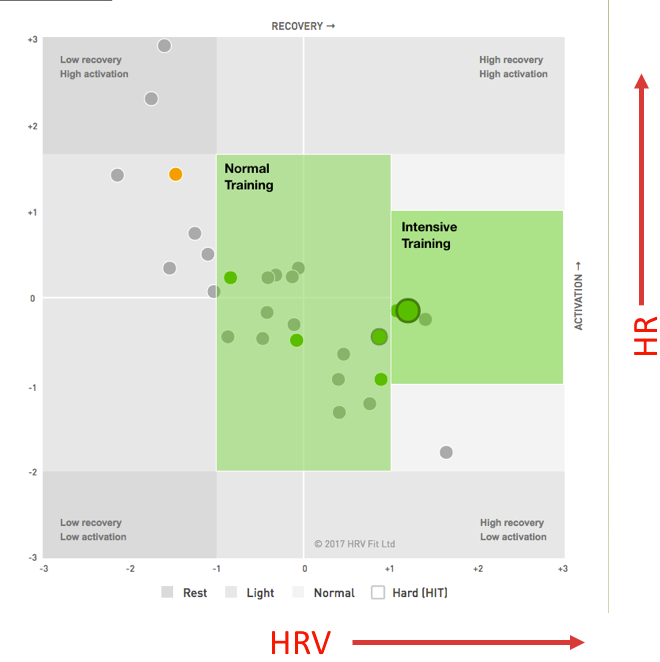
The warning zones are to the left and below the normal & HIIT zones. Although the colour codes are the same as you see in the mobile app, by looking at how far you are into those zones, you can make better judgements on what action to take.
For instance, if you were just into the Impaired recovery amber zone, from green the day before, you might decide to continue with a demanding workout. This might be the case especially if you are in a planned loading week. The Stress / Illness zone does have to be taken seriously though, and you should be able to identify the reason you are in it. If you choose to ignore this warning, you risk making the condition worse, especially if it is the early stages of illness.
The last (but not least!) warning zone is the bottom right. This is counter intuitive to many people, as your HRV is higher, and resting HR lower than normal. You must be getting fitter right? Well not necessarily – sudden increases in HRV combined with drops in HR are more likely to indicate acute fatigue (HRV too high ref). This condition is self-limiting (probably to protect you from further damage), so it’s unlikely you will be able to manage high effort levels or heart rates during exercise. And please don’t use caffeine or other stimulants to override this – you can end up with chronic fatigue if you do, which takes months to get over.
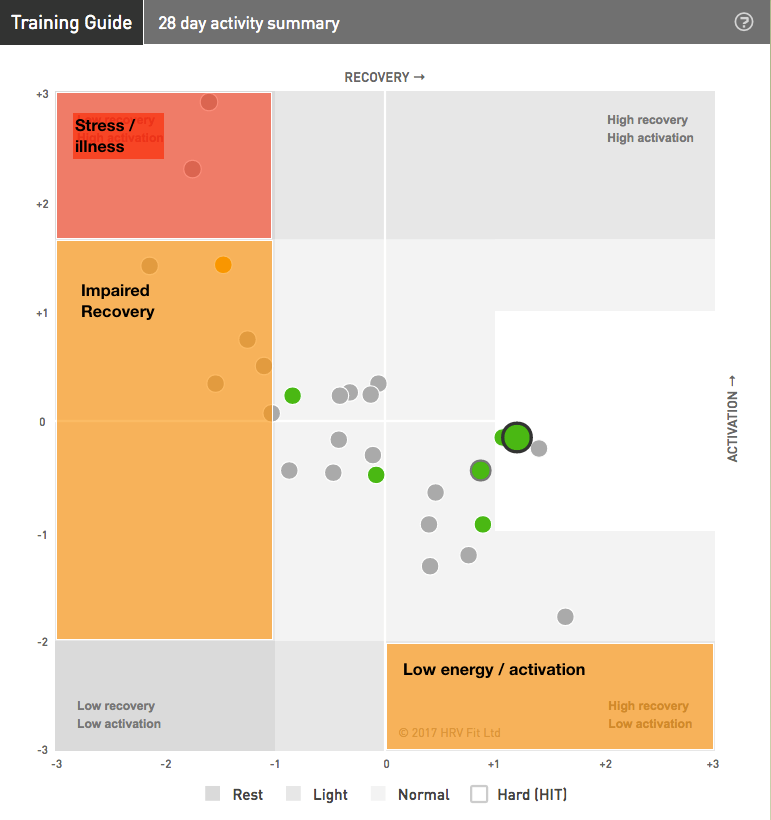
The final trick that the Training Guide has up its sleeve is to show you adaptation. Based on pioneering research by Dan Plews et al., the combination of HRV and HR can show how you are adapting well during training blocks and before competition:
- Coping well (green – below and to the right of centre)
- Not coping well (amber – above and significantly to the left of centre)
- Optimum pre-competition taper state (green – above and a little to the left of centre)
That last one might seem odd – surely you want your HRV higher than normal for race day? Actually, it turns out you give your best performances when your Activation is slightly higher than normal – ie your Fight or Flight response is primed & ready for action.
In summary then, the Training Guide tells you your Recovery, Activation, readiness and adaptation all in on simple chart. Best of all, you can get all you need at a glance, without having to remember any numbers!
For those interested in the science behind the ithlete Pro Training Guide, please see this earlier post The Science Behind the ithlete Pro Training Guide.
Hi,
Today’s my HRV is higher than normal whilst my resting HR is lower than normal. The dot has a circle setted in Intensive Training zone.
The training advice is : “Great recovery and energy levels today. Your HRV baseline is also beginning to rise. Your weekly average Training Load is currently stable. A good day for intensive work and intervals. Go for it!”
I am really surprised that HRV4 Training give me the following advice : “Your HRV is unusually high. It might be a good idea to limit intensity today.”.
One of them is lying ! :-)
Any advice would be greatly appreciated.
Best,
Hi GD,
Thanks for the comment. Higher than normal HRV is an interesting area, and one where the research is not conclusive as to how it should be interpreted. We summarised some of it here https://www.myithlete.com/can-your-hrv-number-be-too-high-heres-the-research/ and HRV Researcher Dr Andrew Flatt (who has used ithlete for 10 years) did an excellent article here https://simplifaster.com/articles/interpreting-hrv-trends-athletes/
In short, mildly elevated HRV compared to your normal baseline is usually a good sign of recovery and adaptation, whereas when it is greatly increased, especially when accompanied by a decreased resting heart rate, can be a sign of adrenal fatigue.
By comparing both your HRV and resting Heart Rate to your baseline values, the ithlete Pro Training Guide is a more sophisticated analysis than usually done, and this approach has been advocated by researchers such as Dan Plews when trying to separate normal recovery from fatigue. The Simon Says AI in ithlete Pro will also take your wellness scores (eg fatigue, muscle soreness) and training loads into account when making a final view.
We would be most interested to get your view on how you felt if you trained on Saturday?
best, Simon.
Good question from GD Rub and a very explanatory answer. Thanks for referring to really interesting articles.
Hi Simon,
Thank you for the feedback. On that day, I’ve made careful (easy run of 30 minutes, then 10 x sprints). I had good feelings but I don’t know how I would have really felt if I started a HIIT session.
Best,
Hi GD
Thanks also for your feedback. Glad that you felt well enough to do 10 x sprints, hope your training is going well overall!
Best,
Simon
Hello, I am a new user of the ithlete pro application and I would like to ask 1) why there is no possibility to increase the HRV measurement time, as is the case with other similar applications? Is 55 sec enough for a safe HRV measurement? 2) I can do other measurements during the day, such as e.g. after training and save these measurements in the history or should I just do the morning measurement, when I am at rest? 3) If I can do more measurements per day, are these included for the final report of the situation, in the Training guide table? Thanks in advance for your reply.
Hi Giannis,
Thank you for your questions and welcome to ithlete.
Regarding the type and duration of measurement I think you would find our page Scientific foundation for ithlete useful. It gives an overview and links to supporting articles/research.
We do recommend only taking the one daily measurement, preferably each morning. Readings taken later in the day would be influenced by such a wide variety of factors such as stress and caffeine, that you just wouldn’t be comparing like with like. However if you really do want to take subsequent measurements with ithlete then they are shown in the list of readings but are greyed out and would not could in charts such as the Timeline or Training Guide.
I hope this helps,
Laura